
DashPO is an online Purchase Order Generator application. You can easily create, edit and save your POs and export to PDF to print, save or send to your suppliers. Here’s a DashPO Guide for you to understand all the features.
Table Of Content
1. Configure your settings
2. Add Suppliers
3. Create Purchase Order Forms
4. Track Purchase Orders
5. Dashboard
6. Account Settings
7. Frequently Asked Questions
8. Last Words
You’ll find a detailed explanation on DashPO features here. So, we’ll give a clear understanding of how to work with dashPO to generate and manage purchase orders. If you have still questions, our team always here to help you with technical questions.

The dashPO app basically includes four main parts:
- Settings
- Suppliers
- POs
- Dashboard
Let’s look closer to each section.
1. Configure your settings
Before starting to use your application, we highly recommend you to set up your basic configurations for a more comfortable and easy usage.
The settings part has two main sections:
- My Company
- PO Defaults
a. My Company Settings
My Company settings are for you to fill out the main information about your company. This info will be used in the relevant sections of your Purchase Orders.
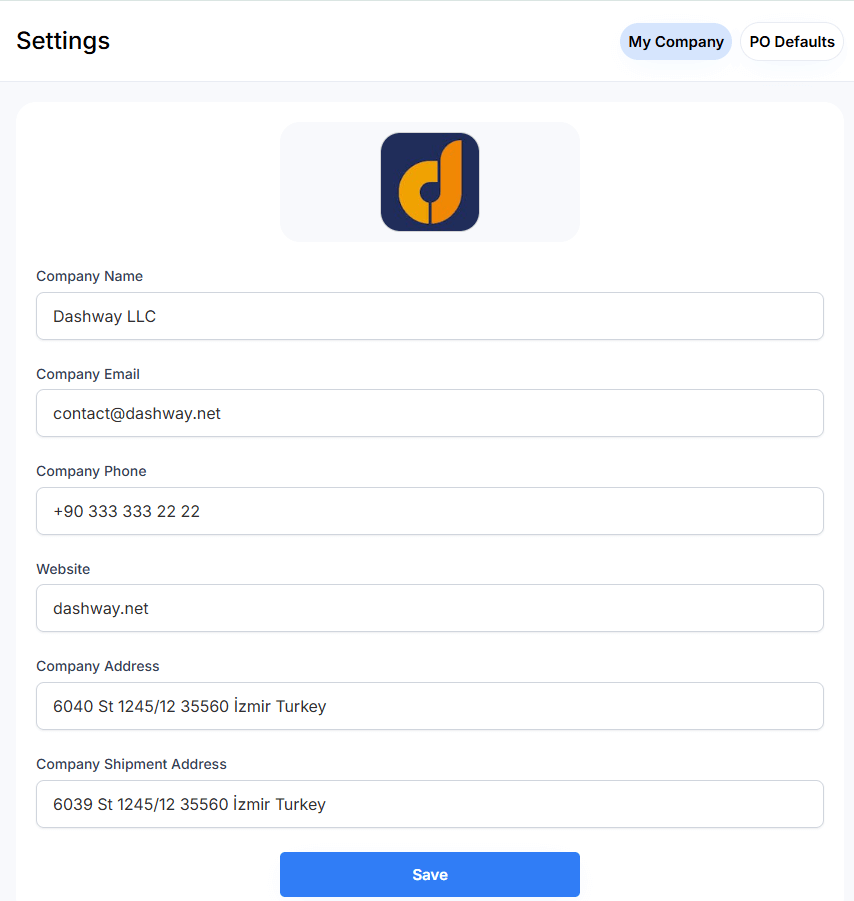
Let’s see the each area here:
- Company Logo: You can easily upload your company logo, which will be seen on the Purchase Order forms.
- Company Email: This might be different from your user email.
- Company Phone: You can add your telephone number here.
- Website: This is for the footer part of your purchase orders.
- Company Address: This info will also be available on the footer section of your POs.
- Shipment Address: This will be seen on the Ship To section of your POs. If your shipment address is the same with your company address, just copy the same text and paste.
b. PO Defaults
Here includes the basic information that will come automatically to your Purchase Orders. But you’ll be also able to make PO-based modifications.
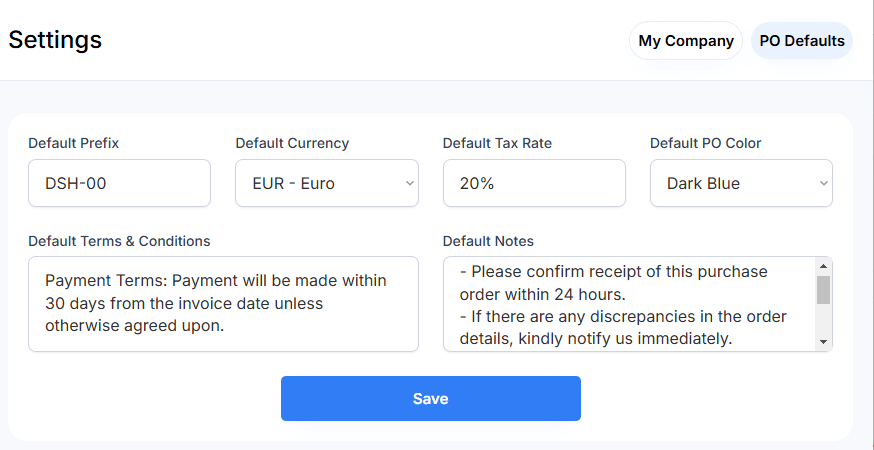
- Default Prefix: You can set a default prefix to use on your Purchase Orders. The PO number will be the combination of the prefix and the number of each PO.
- Default Currency: The dashPO lets you to use different currencies in your purchase orders. But you can select the most-used one here to save time.
- Default Tax: You can set a default tax rate that will be applied to your PO totals.
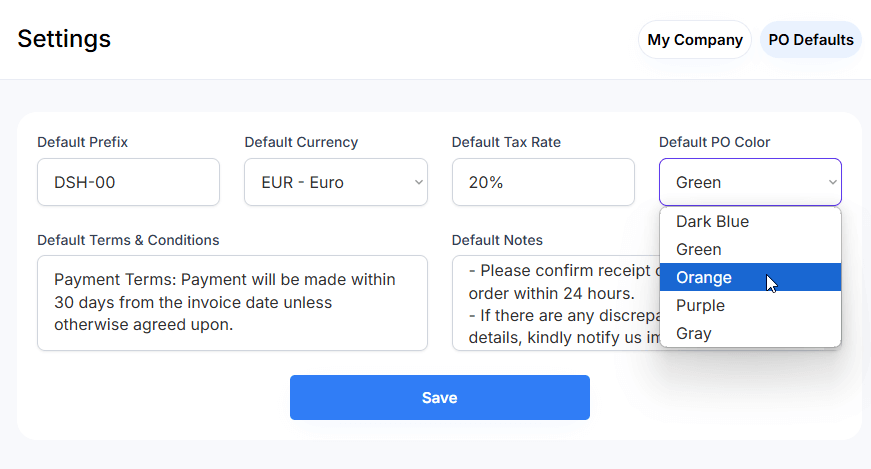
- Default PO Color: Again the dashPO provides you different color options for professional looking PO forms. But you may set one color as the default.
- Defaults Terms & Conditions: In order to prevent you to right the same Terms of Conditions for each PO, you can write it one here, and it will come to your new POs automatically. Of course, you can make PO-based changes
- Default Notes: Exactly the same as the Terms and Conditions. This is a time-saving area for you.
2. Add Suppliers
This is where you’ll create your supplier portfolio.
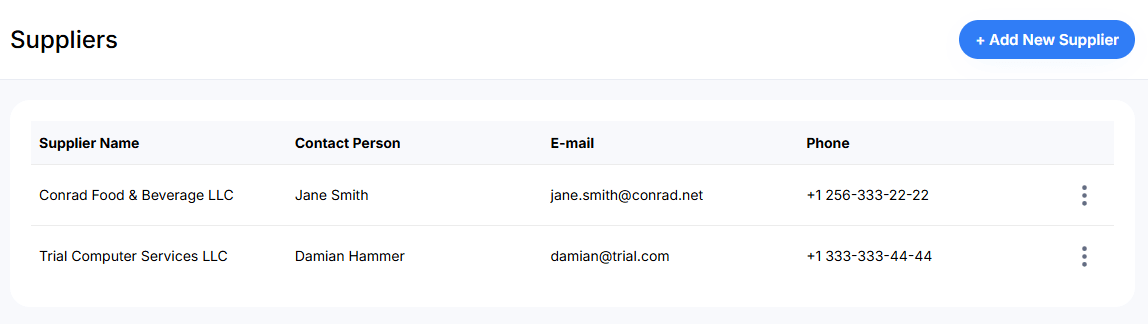
You can add as much supplier as you need.
All you have to do is click the Add New Supplier button and enter the relevant information.
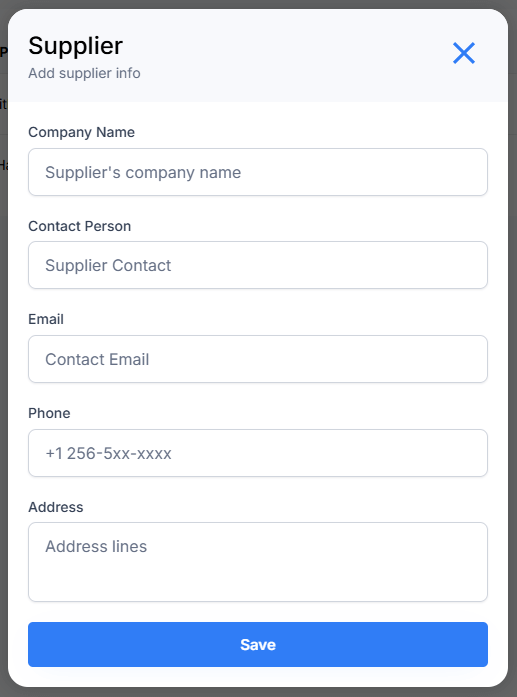
You’ll add the Company Name, Contact Person, Email, Phone and Address info of your suppliers. This info will display automatically on your purchase orders once you select the supplier name from the dropdown menu.
Please remember that you can always add new suppliers or update your existing list.
3. Create Purchase Order Forms
Now the best part is starting: We’ll create purchase forms in a few clicks.
You’ll see a Add New PO button just on the right-top of your screen. So, this button will open the PO Generator Popup. And, this is where you’ll create your POs.
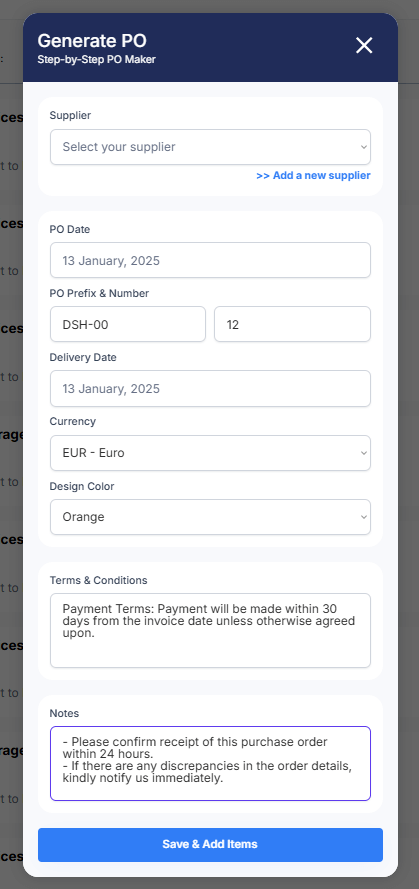
This PO Generator will help you to create purchase order forms with step-by-step sections.
Step 1. Select the Supplier
Firstly, we’ll select the supplier from the dropdown menu.
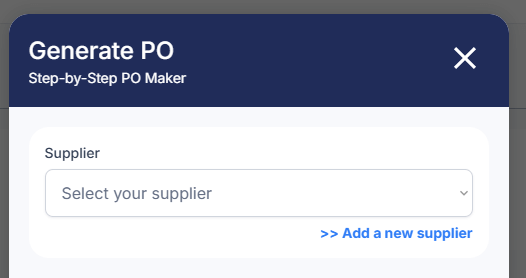
If you cannot see the supplier, then you should first add it to your list. So, you can use the blue Add new supplier link to add a new one to your list.
Step 2. PO Settings
Next section will define the basic info for your purchase order.
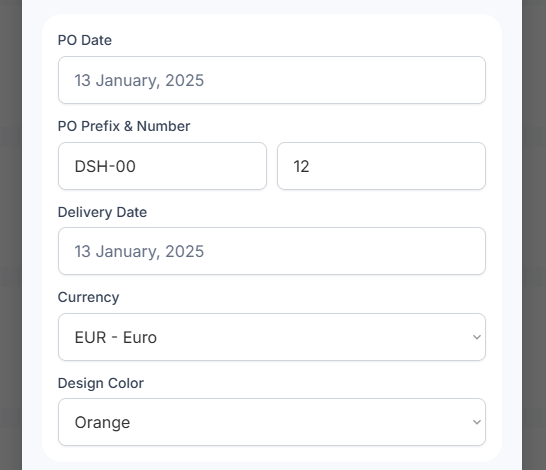
Let’s have a look at each box here:
- PO Date: Select the purchase order date from the calendar.
- PO Prefix and Number: The Prefix will come automatically according to your Default settings. But you can change it if needed. Also, the Number will come automatically according to your last recorded PO. However, this is also modifiable.
- Delivery Date: This is the estimated Delivery date of the items purchased. Again, select a date from the calendar.
- Currency: Your default currency will show up automatically. But you can change it for particular purchase orders.
- Design Color: Again your default color will come automatically. And, you’ll again change it on the purchase order basis. You’ll have choices of Dark Blue, Green, Orange, Purple and Gray options. Select the most suitable one according to your branding colors.
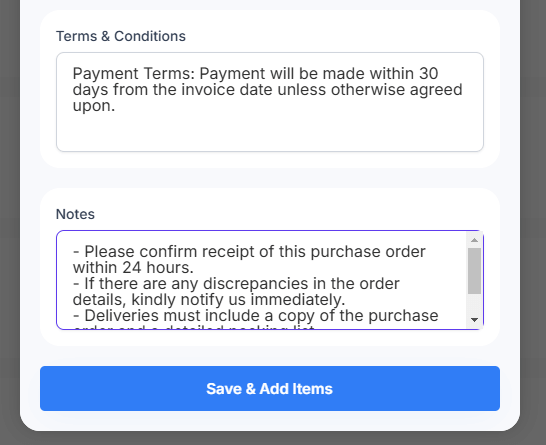
Step 3. Set Terms & Conditions And Notes
First of all, you’ll see your default terms and conditions and notes preset. But you can add new conditions or notes, or edit the existing ones if you need.
Now you’re done with the basic info for your Purchase Order.
Step 4. Add Items
Now we’ll list all the items for our Purchase Order.
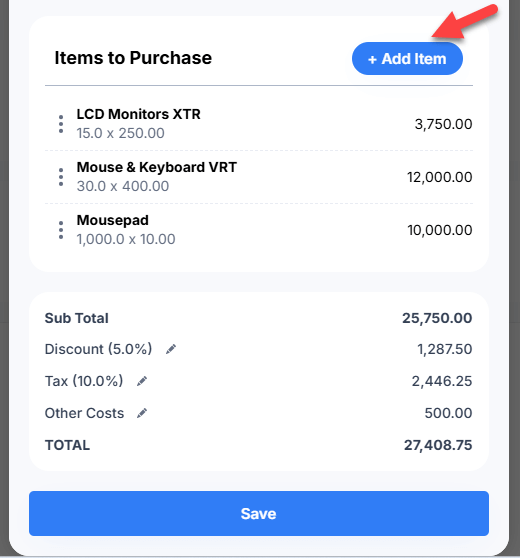
As you’ll see a blue button to Add Items. Click this button to add new items.
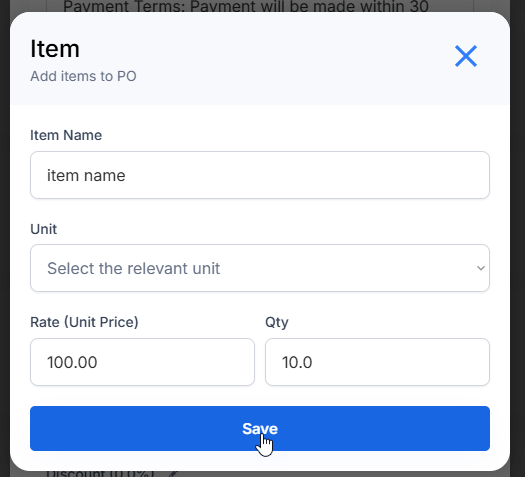
Each item will have:
- An Item Name: A descriptive title for the product or service
- Unit: Select the relevant unit from the dropdown menu
- Rate: The unit price of the item
- Qty: Quantity to be purchased
So, click save to add the item.
Step 5. Set your Discount, Tax and Other Costs
As you know each Purchase Order will have a total calculation which involves the sub total of items as well as a possible discount, tax and/or other costs.
The Discount Rate will be applied to the Sub Total:
You can edit the discount rate with the little pencil icon:
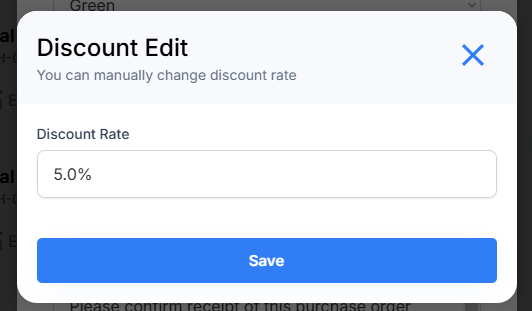
If you do not have any discount, leave this rate as zero.
Then, we’ll add the Tax amount. The application will bring you the default tax automatically. But you can change it manually.
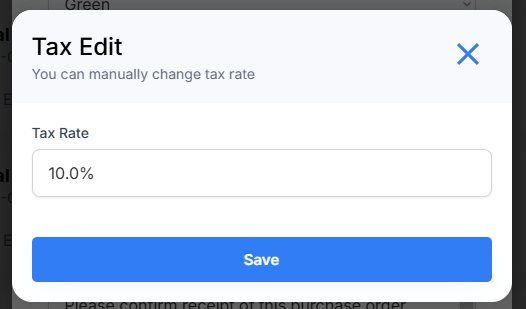
The tax amount will be calculated accordingly:
Lastly, if you have any other costs to add such as shipping costs, handling costs etc, you can add them too.
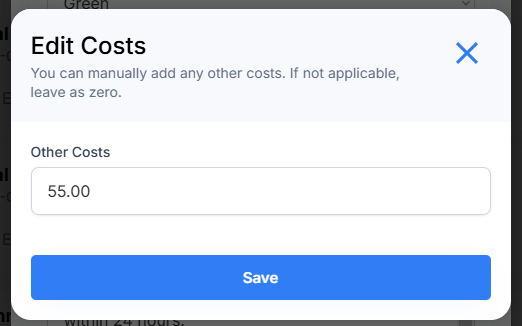
Please remember that unlike the tax and discount, this box is for amount in currency selected, not a rate.
Now the Purchase Order Total will be calculated automatically:
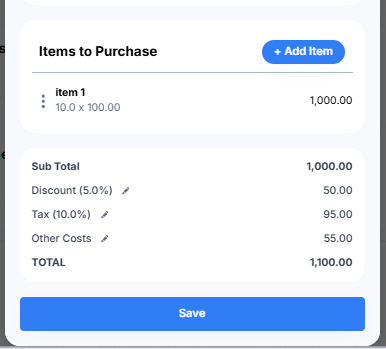
You can always track your totals on the below section while adding items and editing tax, discount and other cost rates.
And the below image shows you how these items will be displayed on your Purchase Order:
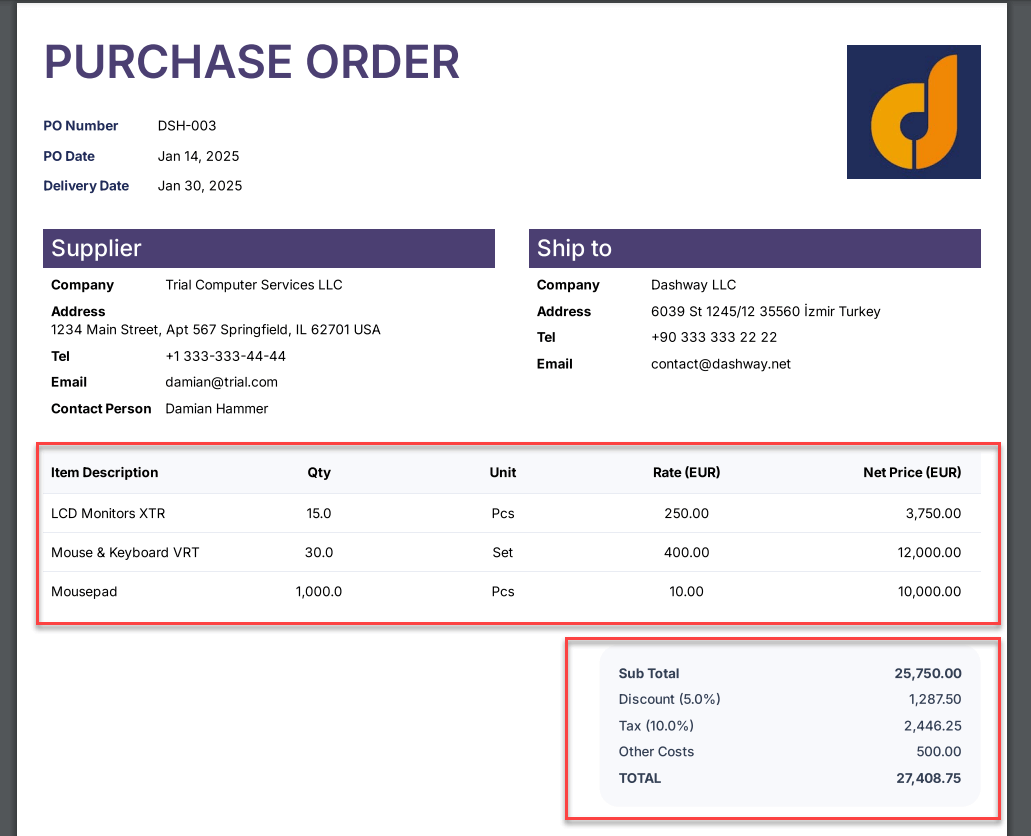
That’s all! Your Purchase Order is successfully created.
4. Track Purchase Orders
Now, you’ll find a list of your purchase orders where you can:
- Edit
- Delete
- Export to Pdf
- Change the Status
This PO Log gives you summary of each PO:
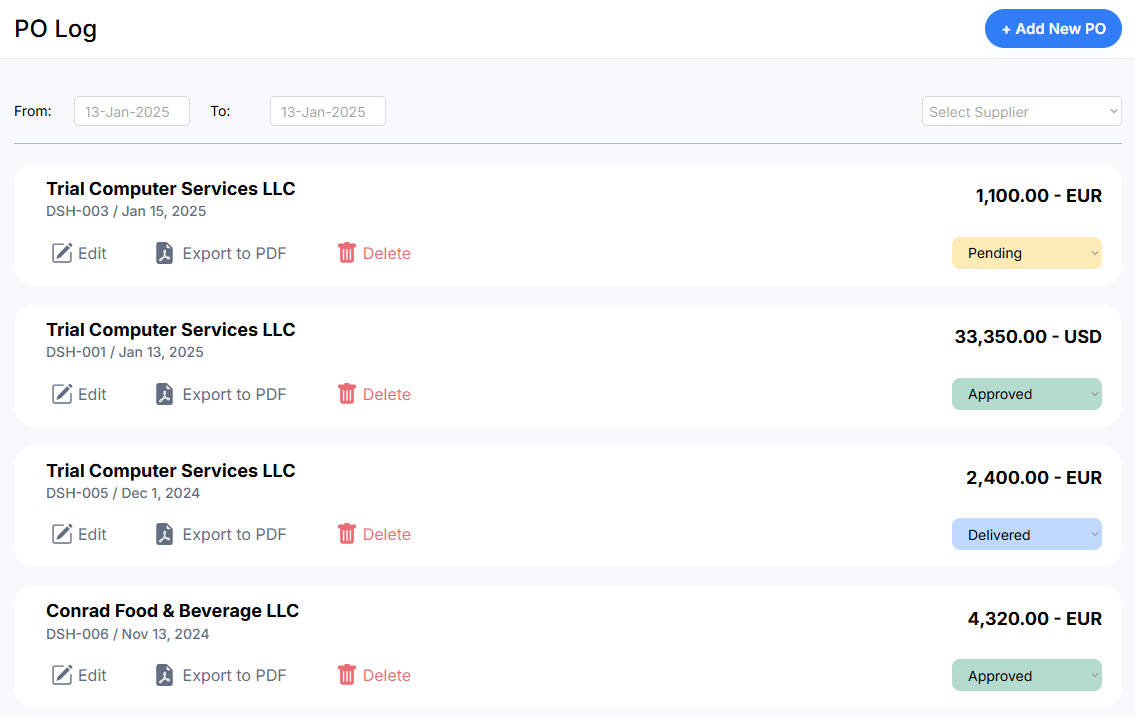
Thus, each PO box will show you the name of the Supplier, PO Number and PO Date, the PO Total as well as Edit, PDF, Delete icons and Status dropdown.
So you can click on the Edit icon to make changes on any of the purchase orders.
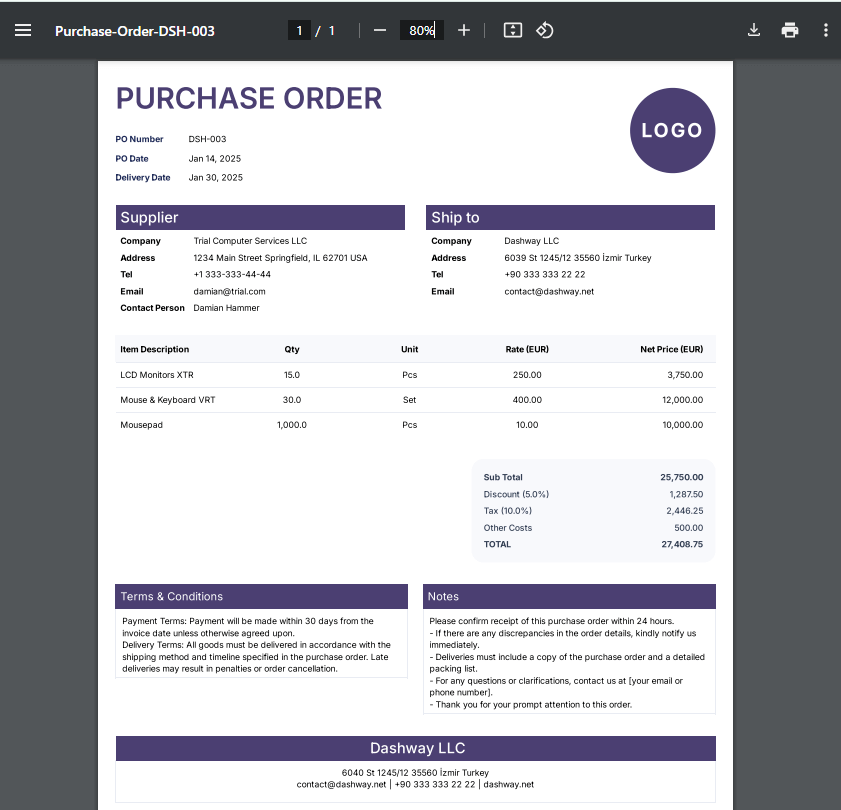
If you want to take a PDF version of the ready PO, then click on Export to PDF icon:
This will open the PDF on a new tab, and you can Download or Print this PDF quickly to send to your supplier or manager.
And now, it’s all up to you to track the status of each purchase order:
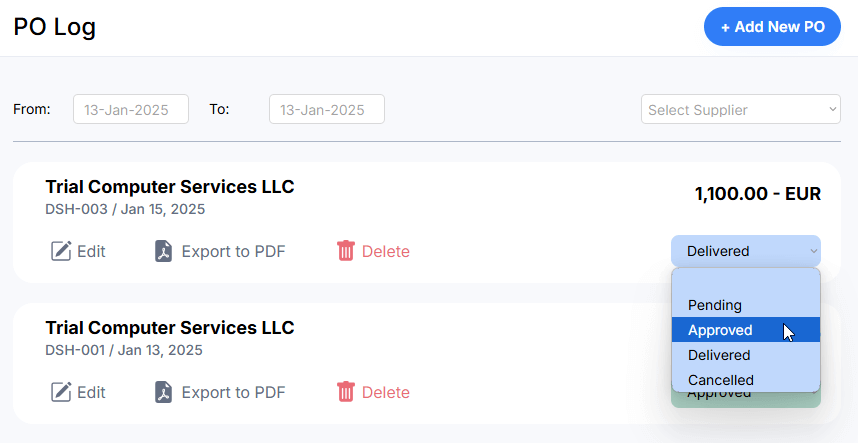
So, you can tag your purchase orders as Pending, Approved, Delivered or Cancelled. These tags will work with relevant colors to show you the status at a glance.
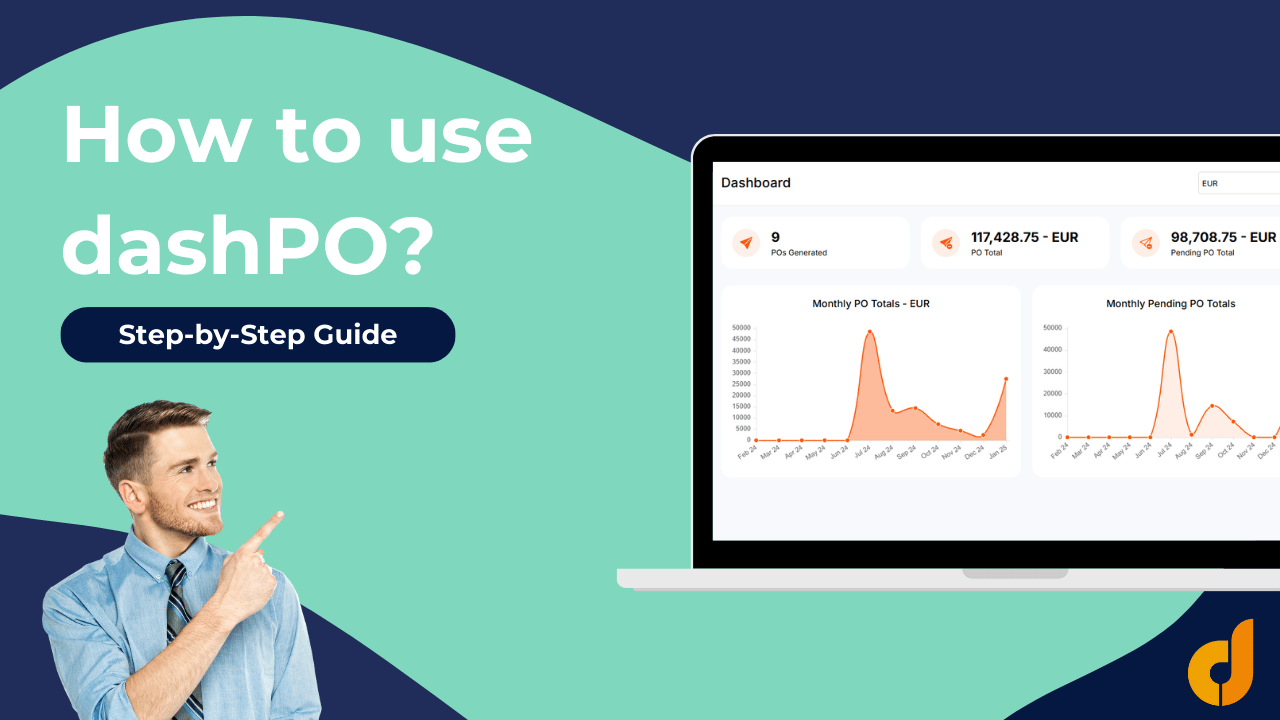
5. Dashboard
Now, it’s time to see a summary of your purchase order management activities.
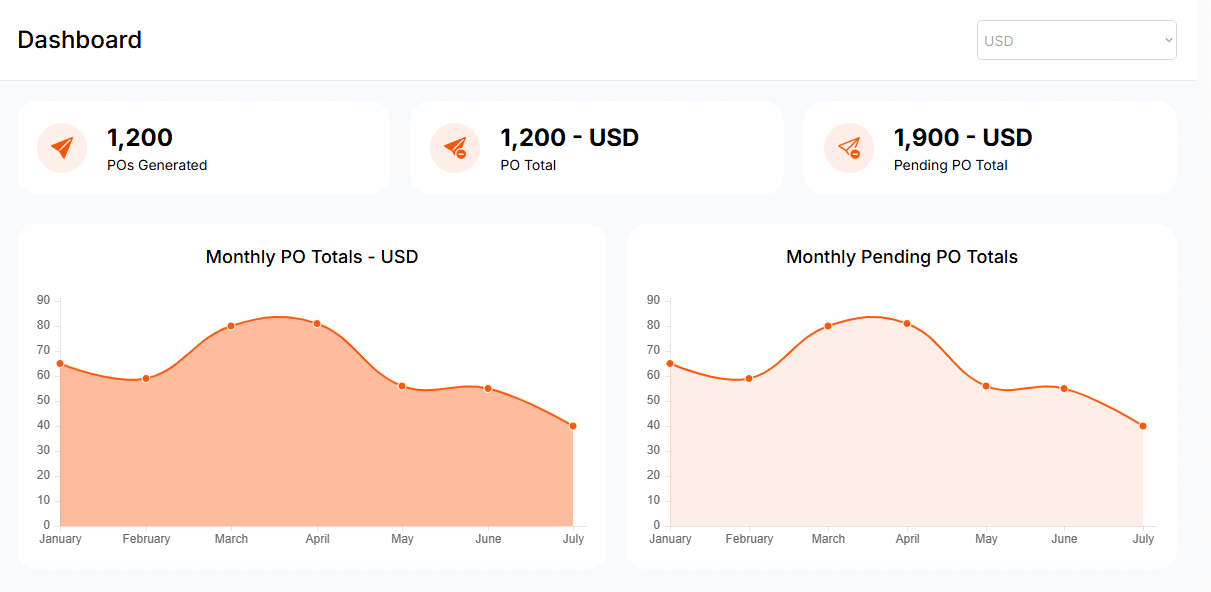
The three info boxes will show you:
- The number of POs generated
- The total sum of the POs generated
- The total sum of the Pending POs
Also, with two charts you can see the Monthly Trends of your Entire PO Totals and also Pending PO Totals.
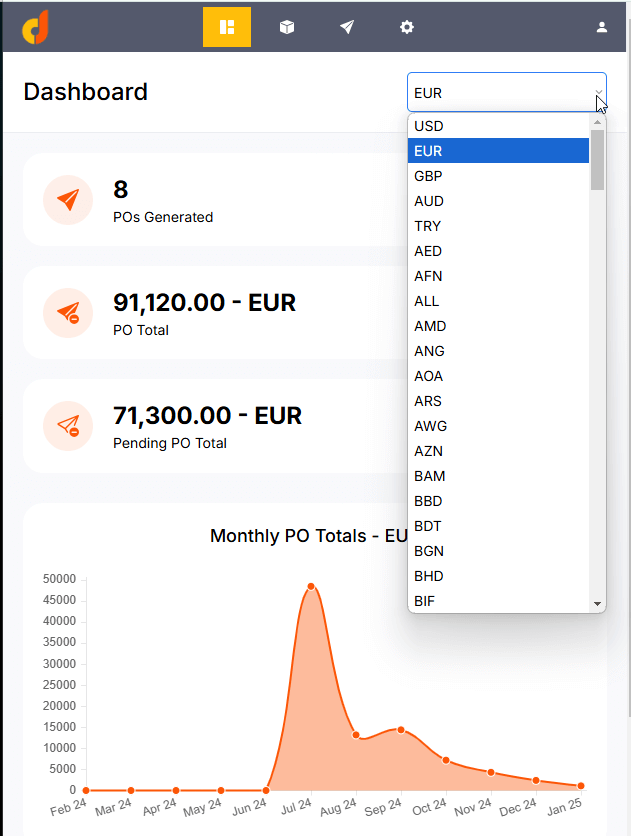
And also, you can use the Currency filter above to change between different currencies.
6. Account Settings
Lastly, you can edit your account settings by clicking on the Account icon on your Side or Top navigation bars.
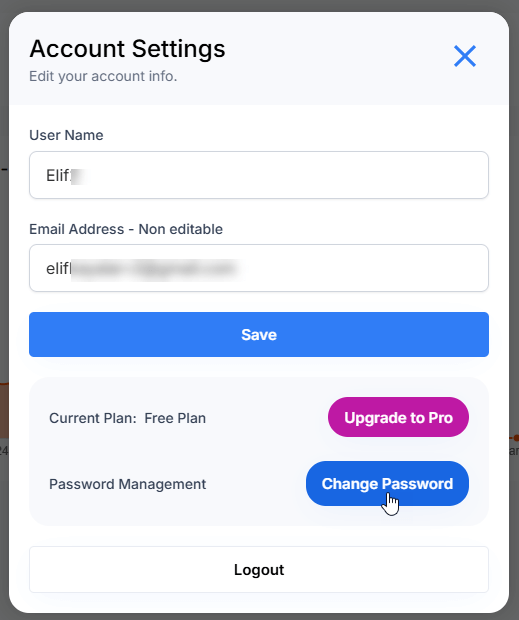
Here you can edit your User Name. But the Email Address is only for showing-purchase as it is not editable. Because this is the original email used to sign up for your account.
You can also change your subscription plan or update your password here. If you need, you’ll find the logout button again here.
7. Frequently Asked Questions
Here are some the most common questions from our users:
a. Can I add different currencies to my purchase orders?
Yes, sure. You can create purchase orders in different currencies. If one of your currencies is more used than the others, we recommend you to set that currency as default on the Default settings, and then define other currencies for particular POs if needed. But please remember that you can not use different currencies in the same PO, as it’s not possible to calculate the PO total in different currencies.
b. Can I use dashPO for my service procurement activities?
Why not? Just add your services as different items.
c. I have two procurers in my team, can we login together?
Yes! You can open only one account and share the same dashboard together.
d. Will I use my own logo on the PO?
Definitely. You can upload your own logo on the Company settings and it will replace the dummy logo.
e. Are those POs exportable to PDF?
Yes, sure. You can export your purchase orders to PDF before printing or sending via email.
8. Last Words
This guide gives you an overall understanding of how the dashPO tool will work for you.
Have other questions? Always feel free to contact us for any questions or concerns.